CHEESY-esque roasted cauliflower that is completely VEGAN and unintentionally so! When I came up with this recipe it was totally a happy accident that it ending up tasting cheesy. There are a lot of fun vegan cheese hacks already out there — using nuts or nutritional yeast or legumes. But this simple, yet super savory concoction came to be from mixing a few condiments that normally would not go together. It became a fav at the little cafe I used to cook for, Paradis, where I was tasked with coming up with recipes every week. I expected the dominant flavors to be miso and tahini; the main components of this recipe. But something magical happened when I blended all of the ingredients together, thickly cloaked cauliflower florets and roasted the whole shebang in a high heat oven.
Ingredients
Yields: 4 servings
1 head of cauliflower, broken down into florets
1 medium onion, large diced (optional)
1/2 cup tahini
2 tbsp white miso
1 to 2 tbsp sambal oelek or your fav hot sauce
2 tbsp rice wine vinegar
1 tbsp water
2 tsp turmeric
2 tsp salt
Instructions
Preheat oven to 450 degrees.
Combine cauliflower florets and diced onion, if using, in a medium sized mixing bowl.
In a separate small bowl, mix together tahini, miso, sambal or hot sauce, vinegar, water, turmeric and salt with a spoon until thoroughly blended.
Thickly cloak cauliflower florets with mixture until evenly coated. Spread florets in a single layer on a foil lined or greased baking sheet. Roast for 20-25 minutes until cauliflower florets are tender and slightly charred.
My friend gave me a jar of good quality turmeric for Christmas and it really is a far cry from the commercial turmeric I’ve purchased in the past. The potency is smooth and bright without being metallic. The variety is called Pragati turmeric and it is ethically sourced from a fourth generation farm in Andhra Pradesh.
I’ve had the flavors of Chả Cá on my mind which was the inspiration for this risotto recipe. Chả Cá is a Vietnamese dish of grilled fish that is prepared with turmeric and fresh dill.
Ingredients
Yields: 8 servings
3 tbsp coconut oil
1 medium shallot
6 cloves garlic
4 tbsp white miso paste
10 cups vegetable stock*
3 cups arborio rice
2 tsp turmeric
1 1/2 cups white wine, sake or mirin
1 lemon, zest and juice
1 tbsp fish sauce
1 (13.5) oz can coconut milk
1/2 bunch dill – washed of all grit (I like to dunk it a few times in cold water and shake it off)
*you can use a mix of vegetable stock + water, or even all water if no stock is available
Instructions
Heat coconut oil in a stock pot over medium heat.
Mince shallot and garlic and saute for 3-4 minutes.
In a separate pot, add vegetable stock and whisk in miso. Bring to a very low simmer and leave on burner next to stock pot.
Add rice and turmeric to shallot/garlic and saute 2 minutes. Add white wine and cook, stiring until all wine has evaporated, approx. 4 minutes.
Now for risotto cooking part…
Using a ladle or one cup measuring cup add hot miso stock 2 ladles/2 cupfuls at a time to risotto, stirring every 1-2 minutes until almost all liquid has evaporated. Repeat 4x more until all stock is used. This process will take 20-25 minutes. When you add the last 2 cups of stock, also stir in fish sauce and coconut milk and cook, stirring, for 5 minutes to finish. Remove from heat. Risotto should be creamy with an al dente chewy bite.
To finish, chop dill and stir in with lemon zest, lemon juice. Season with salt and pepper to taste.
I love cooking a big breakfast — or having a big breakfast cooked for me. But it’s a treat when it happens. On the daily I need options that are quick, healthy and high in protein. I usually want something savory, like eggs and an English muffin or a bagel with cream cheese and lox. I love a bowl of congee or a brothy soup or even sushi but that only happens if I have leftovers. And sometimes I want something sweeter, with fruit and whole grain, like oatmeal. I’ve added these gluten free pancakes to the rotation. They reheat quickly in a toaster oven and are easily portable. I make a bunch, freeze them wrapped in threes and toast them straight from the freezer. Double the protein with a slather of peanut butter. I also like to top them with a little jam or honey and some kind of dried fruit which adds a nice chewy texture element.
Banana Oat Pancakes Yields: 16 small pancakes
Ingredients
2 bananas, mashed with fork
2 eggs
2 tbsp coconut or canola oil + more for skillet
1 cup oat flour*
1/2 cup wheat germ**
1 tbsp baking powder
2 tbsp brown sugar
1/4 tsp salt
2/3 cup some kind of milk (cow, oat, almond, soy, coconut all work)
*oat flour can be made simply by pulsing oats in a blender until texture of wheat flour **if you do not have wheat germ omit and use extra oat flour
Instructions
Whisk mashed banana and eggs together in a medium sized bowl. Measure all dry ingredients directly into wet mixture. Add milk and whisk until just combined.
In a skillet over medium heat, spoon batter to form 2″-3″ pancakes, leaving space between each pancake. Batter will be a little bit thick so use back of spoon to spread batter into a circle. Cook for 2-3 minutes, flip pancakes and cook 2 minutes more. Repeat until batter is finished.
Keep in fridge for up to a week or in the freezer for up to 3 months. Can be reheated in either a toaster oven or regular toaster.
My love for ginger runs deep and I wanted both of these recipes to taste deeply of ginger. Ginger that throws caution to the wind. Ginger that comes out on top. Ginger not one way but in two recipes for you!
This bright, bold dressing is one that I keep in regular rotation. Although I make a variety of ginger dressings — at times with mustard or tahini or cilantro or miso — this one is the golden standard. I like a super intense, detoxifying level, pulpy ginger dressing. Unlike other vinaigrettes that lightly coat a salad (my usual preference), the liberal amount of grated ginger in this dressing basically becomes the main attraction among any other plant based toppings. This dressing does mellow after it sits for an hour or so; the raw ginger, shallot and garlic calm down a bit, but you’ve been forewarned, it does have a bite (in the best way!)
Ginger Dressing
Yields: 3 cups
Ingredients
1 small shallot, sliced
2 cloves garlic
2 1/4 cup ginger, peeled roughly chopped
1/4 c. rice wine vinegar
1 lime, juice and zest
1/4 tsp. turmeric
2 tsp. salt
2 T. honey
1/4 cup water
1 cup neutral oil (canola, pomace, sunflower, grapeseed)
Instructions
Add all ingredients except oil to a blender or food processor. Process/puree until smooth, then, with machine running, slowly stream in all of the oil until emulsified.
A note! When peeling ginger use a soup spoon instead of a straight peeler to get around all it’s voluptuous curves.
………………………………………………………………………………
This is my go to buttermilk scone recipe. It’s a great base for a variety of add-ins, sweet and savory. One of my favs is with lots of ginger and lemon zest and not much else to keep the flavors clean and uncomplicated. I brush this scone with a ginger infused simple syrup made from simmering the leftover ginger peels with equal parts sugar + water. Paint the syrup on 5 minutes before the end of the bake and it gives the scones a nice shiny glaze and a little extra flavor boost.
Ginger Lemon Scones
Yields: 8 scones
Ingredients
2 sticks butter, chilled and cubed
1/2 cup buttermilk, chilled
2 T. water, chilled
1 egg, chilled
2 cups flour
2 1/2 tsp. baking powder
1/2 tsp. salt
1/3 cup sugar
2 T. lemon zest
4 T. ginger, peeled and grated — save the peels!!
For simple syrup: 1/2 cup water + 1/2 cup sugar + peels from ginger, simmered over low heat for 5 minutes
Instructions
Preheat oven to 400 degrees.
Dice butter into small cubes (a stick is cut into 4×4 cross sections, then sliced about a 1/4″ down the length.) Put in the fridge until ready to use.
In a small mixing bowl whisk together buttermilk, water and egg. Put in fridge until ready to use.
In a large mixing bowl, measure flour, baking powder, salt and sugar. Whisk together to incorporate dry mixture evenly. Grate lemon zest and ginger and add to flour mixture.
Add chilled cubed butter to dry mixture and pinch with fingertips until butter breaks down into small pea sized pieces. Half of the mixture may resemble coarse sand and the other half the pea sized pieces of butter. These little pearls are good for your scones! Sandy pieces of butter = tenderness while pea size pieces of butter = flakiness.
Add buttermilk mixture to dry mixture and fold in with a fork. Mix until just combined — just as the dough starts coming together stop mixing with the fork…the rest will be by hand! The dough will not be completely cohesive but it should come together enough to dump out of the bowl in 2-3 large globs. Turn dough out onto a well floured surface and pat together (see note) to form a rectangle, about 2 inches in height. Criss cross cut to make triangle shapes and place on a baking sheet.
Brush tops with buttermilk and bake for 35-40 minutes. During last 5 minutes of baking time, brush the golden brown tops with the ginger simple syrup and put back in oven. Then transfer scones to a cooking rack for as long as you can resist biting into one.
Note: Scones do not require rolling out like biscuits or kneading like bread. You will want to use light pressure from your fingertips and work the dough just enough until it is able to become a shape, in this case I chose a rectangle (but scones can also be cut from a wheel!)
I’ve been on the tahini train and I’m not gettin’ off. It is a star ingredient in my menus for the cafe & catering spot I work at. I like to incorporate it into soups and sauces and cloak vegetables with it before roasting them. Ever since I made these cookies, adapted from a David Lebovitz recipe (who modified it from a Danielle Oron recipe), I’ve been dreaming up all sorts of baking recipes I want to try and create — tahini cinnamon rolls with tahini cream cheese glaze, tahini caramel monkey bread, brioche with a concha style, crunchy tahini top. I just read something by The Splendid Table, that in Israel they put tahini in a squeeze bottle so you can top frozen yogurt with it and it creates a kind of magic shell (?!)
I tried the Lebovitz recipe without any modifications — it was kind of like the best chocolate chip cookie you’ve had with some toasty, savory addictive quality that you can’t quite put your finger on. (Because tahini + dark chocolate + sea salt, need I say more?) But I wanted to try out a gluten-free version with an even bigger boost of tahini flavor, so I swapped out the all purpose flour with oat flour and replaced some of the butter with even more tahini.
The results? Super chewy, thin, turbo tahinied cookies that didn’t last long around this household.
Ingredients
Some notes: Oat flour is easy to make at home if you have a Vitamix or coffee grinder. Just grind oats until powdery and flour-like. Also, if your tahini is hard to stir just dump the entire contents into a mixing bowl and beat with an electric mixer until smooth. Return whipped tahini to jar.
1 cup oat flour (see note above)
3/4 tsp. baking soda
1 tsp. salt
2 tsp. cornstarch
4 T. butter
3/4 cup tahini, stirred well
1/2 cup sugar
1/2 cup brown sugar
1 egg, at room temp
1 egg yolk, at room temp
1 tsp. pure vanilla
2 cups dark chocolate chunks or semisweet chocolate chips (I used both because that’s what I had on hand)
flaky or coarse sea salt
white sesame seeds
Instructions
In a small bowl, whisk together oat flour, baking soda, salt and cornstarch. Set aside.
In a separate mixing bowl, cream butter, tahini and sugars together, beating for 2 minutes with a handheld mixer or if you have it, a KitchenAid mixer (jealous).
Add egg, egg yolk and vanilla and beat until yolk is well incorporated. Scrape the sides of the bowl and add oat flour mixture. Beat on low speed until JUST combined — do not overmix. Fold in chocolate chunks/chips by hand.
Roll or scoop cookies into a 2 oz portions and place on a greased baking sheet, 2 inches apart. Sprinkle the top with a pinch of sea salt and sesame seeds. Bake in a 350 degree oven for minutes.I loooove using my dark coated baking sheets for any kind of chocolate chip cookie. It really caramelizes the sugars of the bottom of the cookie, while the inside stays gooey and chewy.
Cheese + Pepper. A simple craving to be satisfied and a simple Roman inspired soup to satisfy it. Cauliflower is blended with veggie stock, garlic and an ample amount of Parmigiano Reggiano and Pecorino Romano. I added in some butter beans and Greek yogurt for creaminess and a boost of protein. The yogurt also adds a nice bright tang to counterbalance the richness of this soup. I reheated the leftover soup with cooked pasta shells for fun — giving it a competitive edge to the beloved: mac n’ cheese. Cauliflower for the win.
Cacio e Pepe Cauliflower Soup
Yields: 4 servings
Ingredients
1 T. butter
1 T. olive oil
1 yellow onion, diced
6 cloves garlic, minced
1 T. fresh thyme, chopped
4 cups vegetable stock
4 cups water
1 medium sized cauliflower head, large dice
1 – 15.5 oz. can butter beans
2 cups Parmigiano-Reggiano, grated on microplane
3/4 cup grated Pecorino Romano (I had pre-grated on hand so used that — which is fine for either cheese but for the sake of texture I would recommend only buying pre-grated for one, not both)
1/2 cup Greek yogurt
I use all parts of the cauliflower except the core. If the leaves are in good shape, use them! They are mild flavored and tender when simmered. I also use a microplane to grate cheese, but the small side of any grater will work as well.
Instructions
In a large pot, sauté diced onion, minced garlic and thyme in butter and olive oil for 5 minutes over medium heat, stirring occasionally.
Add vegetable stock and water and bring to a simmer over high heat. When stock comes to a boil, add diced cauliflower, cauliflower leaves and butter beans. I also threw in the rind of the Parmigiano, which is fine to simmer and adds flavor.
Reduce heat to low, cover and simmer for 30 minutes.
Remove from heat and transfer soup to a blender or use a handheld blender and pureé until smooth. Stir in both cheeses and greek yogurt and stir until well combined and cheeses are melted.
It’s soup season! I wanted to make a non-heavy, super greenified chili and this came out exactly as I was hoping for. The base is a winning mix of blended tomatillos, poblano pepper, jalapeño pepper, cilantro and chicken stock. It is a simple recipe and quick weeknight meal, especially if you cook and shred the chicken in advance. I wanted to keep this recipe uncomplicated so I used only a few standard spices (even though the Indian in me was screaming add seven more spices, do it now, it’s in your blood!). I’m glad I kept it simple because it really allows the brightness of the tomatillos to come through.
Chili Verde with Chicken, White Beans and Tomatillos
Yields: 6 servings
Ingredients
2 lbs. cooked chicken, shredded (see note)
2 cups water + 1 cup water
2 garlic cloves
1 poblano pepper, seeds removed, cut into large chunks
3 tomatillos, husks removed, halved
1 jalapeno pepper, cut into large chunks (for spicier do not remove seeds)
1/2 bunch cilantro, roughly chopped
1 T. olive oil
1 medium size yellow onion, medium dice
1 green bell pepper, medium dice
2 tsp. ground cumin
2 tsp. ground coriander
1 tsp. dried oregano
32 oz. chicken stock or broth
2 (19 oz) cans white beans, drained
1 (5 oz) container baby spinach
Optional toppings: lime wedge, radish, sour cream
Note: You can use any cut of chicken — I would just recommend using bone-in, skin-on pieces which will yield a tender, moist and more flavorful chicken from the oven poaching process.
Instructions
Preheat oven to 350º.
Season chicken with salt and pepper on both sides. Place in a baking dish and pour 2 cups of water into the dish. Cover with foil and bake chicken for 30 minutes.
Place garlic cloves, poblano pepper, tomatillos, jalapeño pepper, cilantro and 1 cup of water in the blender. Purée until smooth. Set aside for a moment.
In a large stock pot, add 1 tablespoon olive oil. Sauté onion, green bell pepper, cumin, coriander, oregano, salt and pepper over medium high heat for 3 minutes, until softened. (A little char on the bottom of the pot is fine — it will add flavor when delgazing the pot with liquid.) Add the remaining chicken stock + 1 cup water and turn heat down to medium low. Add tomatillo/pepper purée. Add drained white beans. Stir and let simmer for 20 minutes.
If chicken is cooked through, pull from oven and allow to sit for a few minutes to cool down. When cool enough to handle, pull meat off the bone, discard skin and bones and add meat to the pot. Also add any remaining juice from the pan you cooked the chicken. During the last 2 minutes of simmering time, stir in the spinach. Season soup with salt and pepper, to taste.
Ladle into bowls and if you’d like, serve with lime wedge, radish and a dollop of sour cream. I keep the Sriracha or Tapatío (or this hot sauce I’ve been wanting to try) nearby too!
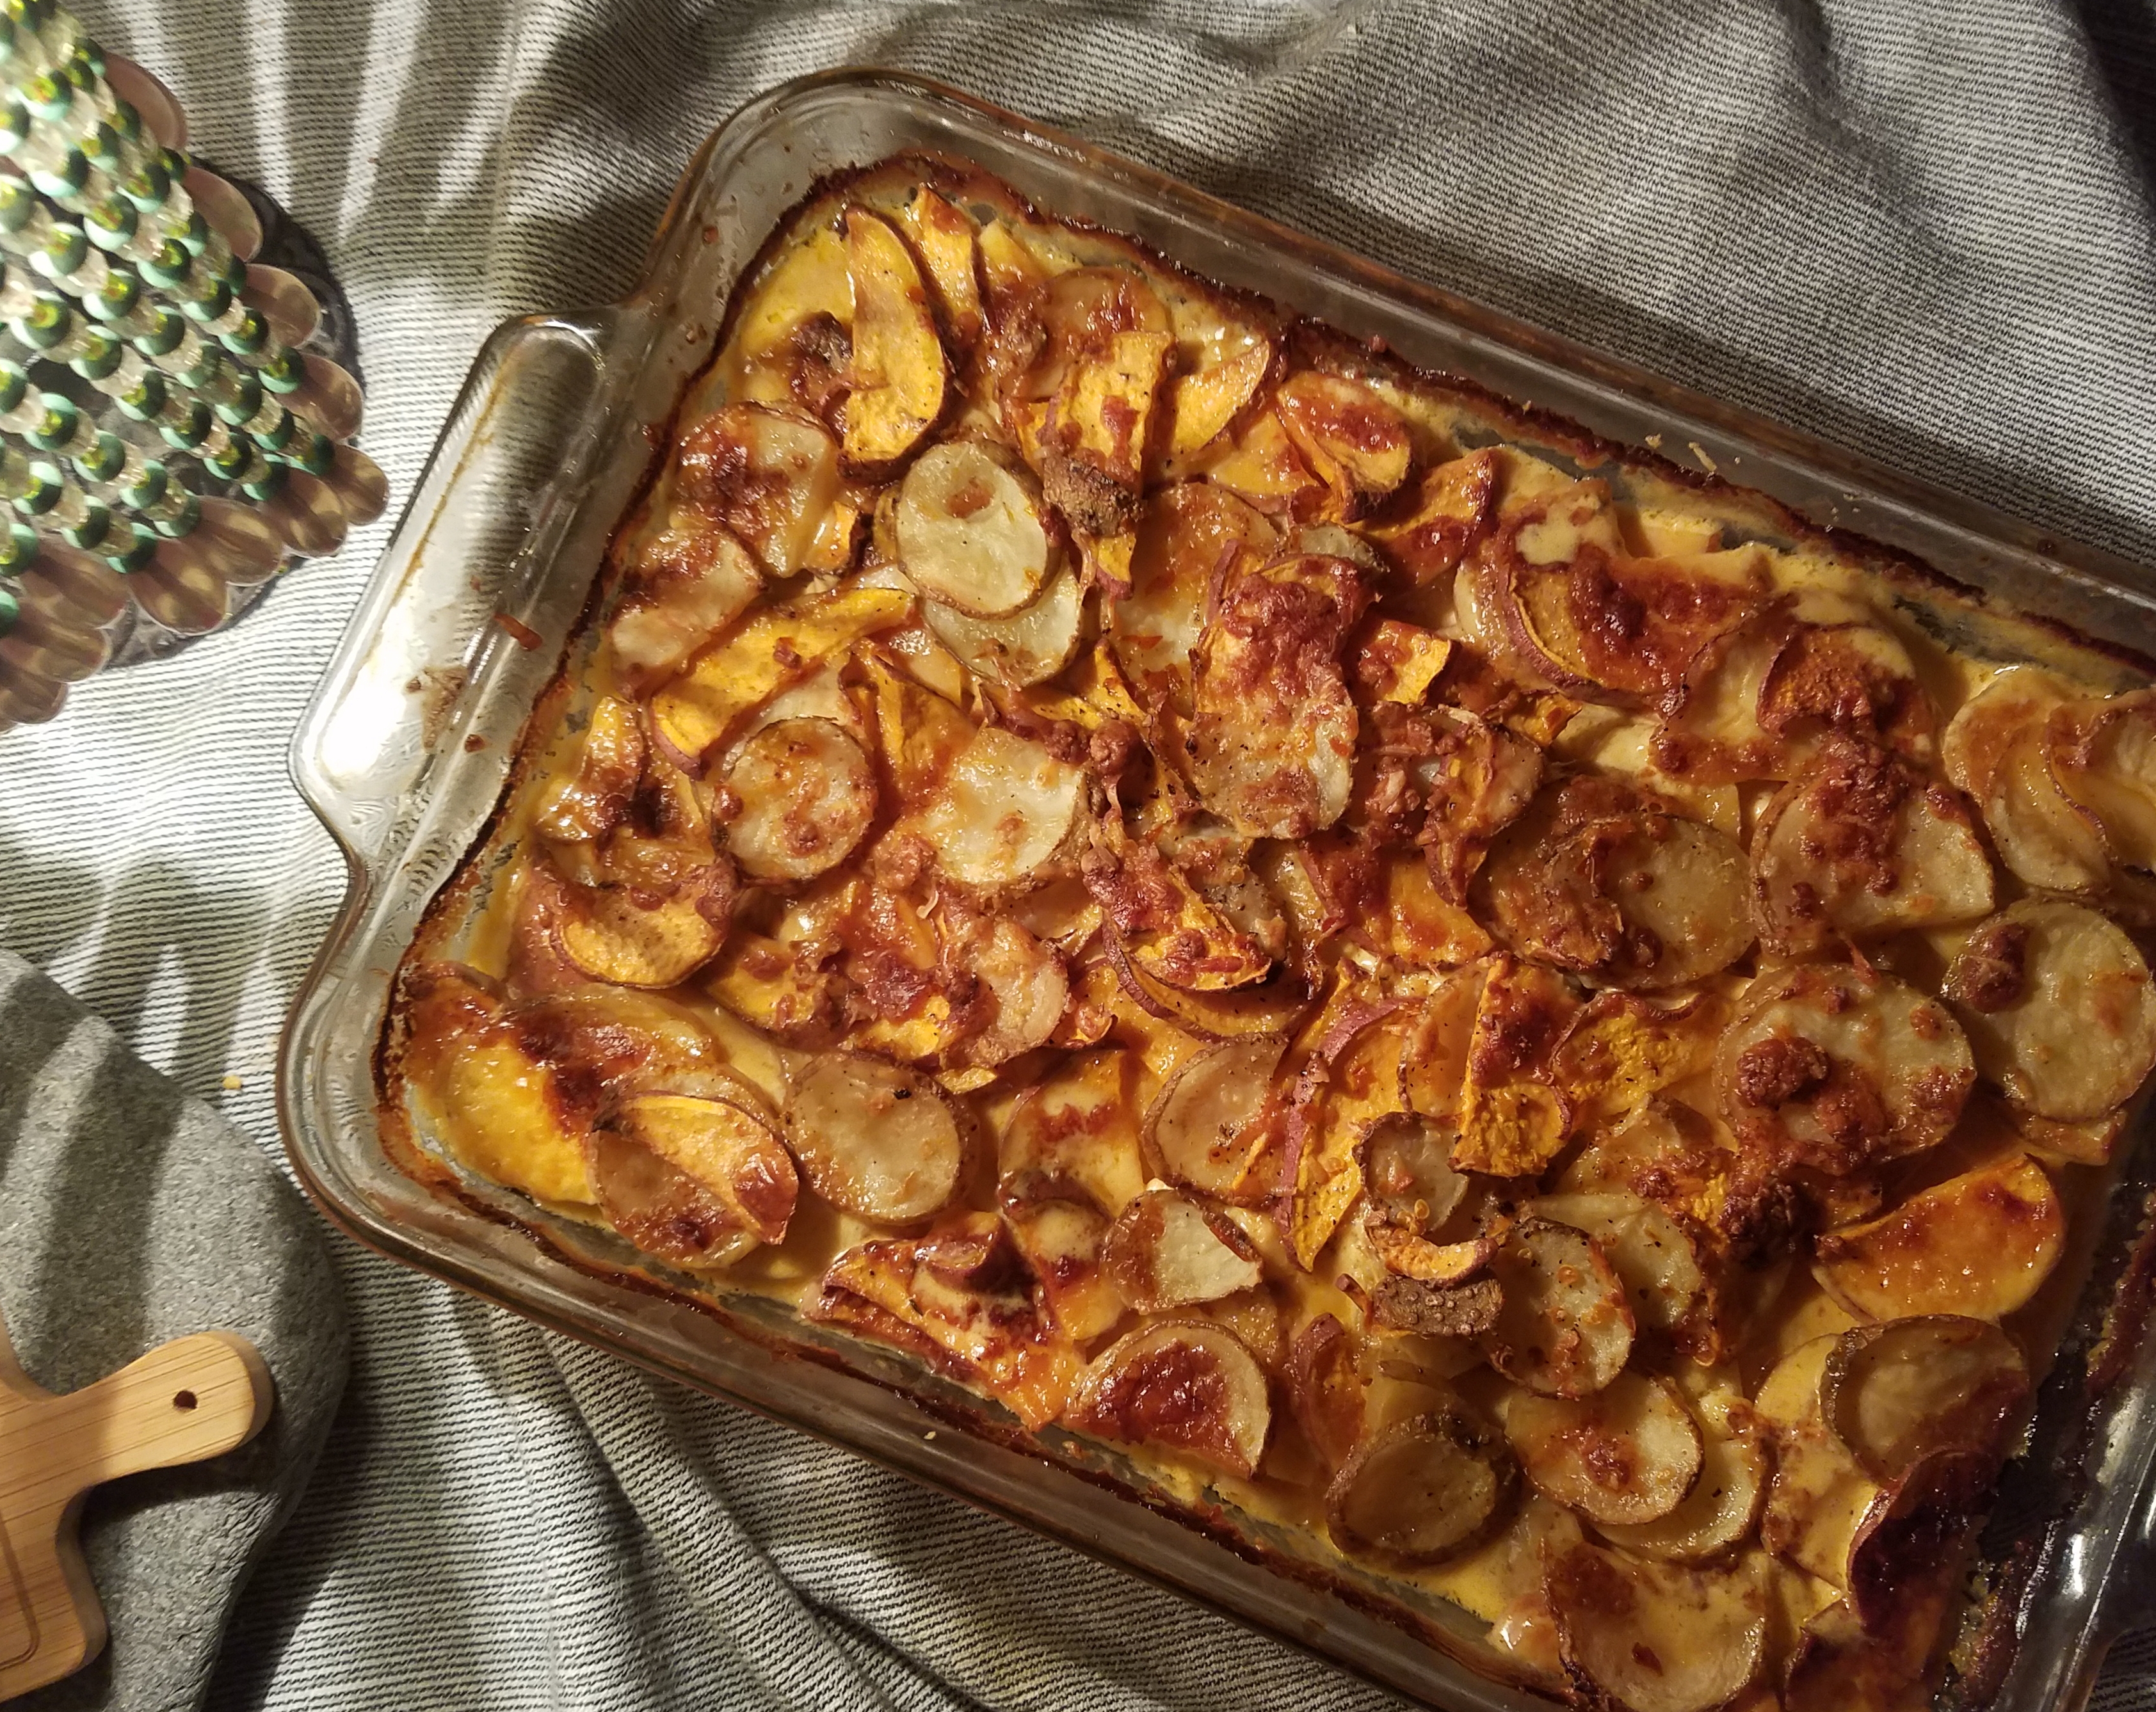
I went to the opera for the first time, thanks to my friend’s neighbor who designs costumes for the Metropolitan Opera House giving her extra tickets for Mefistofele. The story is the Faustian legend retold, rife with themes of good vs. evil, human despair and suffering and of course, a doomed love. It was delightful and dramatic — between the costumes, orchestra, amazing set changes and the tremendous vocal talent it was a captivating (and at times, delightfully raunchy) performance. I loved the theater — as decadent as this scalloped potato recipe, which came to be after looking up at the ceiling and getting an immediate craving for cheesy potatoes…
Cheesy Scalloped Potatoes
Yields: 1 9×13 pan (12 servings)
Ingredients
2 lbs. Yukon Gold potatoes, skin scrubbed and 1/4″ thinly sliced (or any domestic white potato)
2 lbs. sweet potatoes, skin scrubbed and 1/4″ thinly sliced
2 1/2 cups heavy cream
1 T. sambal (for spicier, use 2 T. which is what I did)
2 T. fresh thyme, finely chopped or 1 T. dried thyme
4 oz. créme fraîche
1/2 cup Gruyère cheese, grated on large hole side
1/2 cup Pecorino Romano cheese, grated on large hole side
1/2 cup bleu cheese, crumbled (I used a Danish bleu)
Butter, for greasing the pan
Salt & Pepper
Sambal is a garlic chili paste of Indonesian origin. It can be found in most Asian or specialty grocers, although it has become more mainstream and often can be found in commercial grocery stores as well, next to the Sriracha.
Instructions
Preheat oven to 375º. Use a small amount of butter to grease the inside of a 9×13 baking dish. Set aside.
Whisk heavy cream, créme fraîche, sambal and thyme together with salt and pepper, to taste. In a separate bowl, combine Gruyère, Pecorino Romano and bleu cheese.
Layer sliced potatoes in the baking dish, alternating Yukon and sweet potatoes. Layer in even rows by placing each potato round slightly overlapping the one next to it. Repeat until the layers have come to the middle of the baking dish.
Pour half of cream mixture over the layered potatoes. Sprinkle three-quarters of the cheese blend evenly over the potatoes. Repeat layering potatoes in even rows until you finish all the potatoes. Pour the rest of the cream mixture evenly over the top and sprinkle the rest of the cheese blend.
Bake for 60-70 minutes uncovered, until top is browned. Let sit 15 minutes before serving to allow cream to thicken and soak into potatoes.
Crunchy. Zippy. Earthy. Toasty. Bright. This salad combines a texturally pleasing duo of raw and roasted sprouts with a punchy raw ginger dressing and warmly spiced cashews. I love the kick of an ultra gingery dressing, the kind that bites back. Just a bit of Chinese hot mustard adds a hint of sharpness and is rounded out with just enough maple syrup to bring all the flavors together. It was a hit at the Thanksgiving table and also is a great nutrient rich post-holiday salad, full of antioxidants, minerals, fiber and anti-inflammatory properties from the power trio of Brussels sprouts, cashews and ginger.
Raw & Roasted Brussels Sprouts Salad
Yields: 6-8 servings
Ingredients
2 lbs. Brussels sprouts
2 glugs olive oil
1 T. coconut oil
2 cups cashew halves, raw and unroasted
2 T. brown sugar
2 T. water
2 tsp. garam masala
1 tsp salt
3/4 cup fresh ginger, peeled and coarsely chopped (measure after chopping)
2 T. pure maple syrup
1 – 2 T. Chinese hot mustard (depended on preference — I used 2)
1 1/2 tsp. kosher salt
1 cup of a neutral oil, such as pomace, canola or sunflower
Instructions
Note: Any of the elements (steps 1, 2 and 3) of this salad can made several days in advance, so don’t let all the steps intimidate you! Keep in mind that many of these steps I organized to overlap, so you can prepare this as efficiently as possible.
Step 1: The Sprouts
Preheat oven to 400º.
Clean & trim Brussels sprouts by slicing a thin sliver off the stem end (see top of photo left). If you slice off too much your sprouts are going to fall apart (and waste some of the good stuff)! Halve sprouts lengthwise.
Separate sprouts into two piles. For the raw sprout prep, place a sprout on it’s flat side. Very thinly slice to create a shredded texture (see bottom of photo left). Set aside in a large mixing bowl. Toss the other half of the halved sprouts with a little bit of olive oil and salt and spread in a single layer on a baking sheet. Place on upper rack of oven and roast for 35 minutes.
Step 2: The Nuts
Melt coconut oil in a sauté pan over medium high heat. Add cashews, brown sugar, water, garam masala and salt. Stir until combined. Toast cashews until lightly browned and spices are fragrant, about 2 minutes.
Spread cashews on a foil or parchment paper lined sheet tray and pop in the oven on the bottom rack (placed above the sprouts so the nuts do not get steamed) for 7 minutes. Remove from oven and while the cashews are still warm give them a stir to loosen nuts from tray (as they cool they stick). Set aside to cool for later use.
Turn up oven temp up to 450º and move Brussels sprouts to the bottom rack to finish roasting.
Step 3: The Dressing
While the Brussels sprouts are finishing roasting, this dressing can be made quickly in a blender.
Squeeze the lemon into a blender. Chop ginger into medium size chunks and add to blender. Add raw apple cider vinegar, maple syrup, Chinese hot mustard and salt. Blend smooth. With blender running, slowly stream in oil until the dressing is thoroughly blended and emulsified.
Step 4: The Assembly
Add roasted Brussels sprouts to the large mixing bowl containing the raw, shredded sprouts. Add 1 cup of the ginger dressing and mix thoroughly until the sprouts are well coated. Transfer to a serving bowl and sprinkle a generous amount of the spiced cashews on top. This salad holds up well to the dressing, so can sit for hours — it actually gets better as it marinates. If you do decide to dress it in advance, add the cashews at the last minute so they retain their crunchiness. Enjoy!
I love Fall slow cooking, with its cozy flavors and plethora of stodgy squashes. I particularly like cooking with good old pumpkin, and prefer it’s texture and taste to its famed cousin, butternut. Here is shares the stage with a variety of mushrooms (mostly shiitake), prepared with a savory miso broth.
Miso Mushroom Risotto with Roasted Pumpkin
Yields: 6 servings
Ingredients
1 shallot, minced
1 medium onion, minced
12 ounces mushrooms, sliced (a variety is nice)
2 cups sugar pumpkin, peeled and cubed
32 ounces vegetable stock + 8 ounces water
2 T. miso (I used red, but any will work)
1/2 cup wine
1 cup risotto
1 T. butter
olive oil
and you may want to…
-add a little bit of sage chiffonade (very thin ribbons) or seaweed strips to garnish
-shave parmigiano or pecorino for a super umami quality
-or just shovel it into your face as is
Instructions
Note: Several things will be happening at the same time to for the first few steps to streamline the process: Roast pumpkin–Warm broth–Sear mushrooms.
In a medium sized saucepan, bring vegetable stock, water and miso to a simmer, whisking miso to incorporate. Reduce heat to low and leave on the burner to warm.
Roast pumpkin cubes in a 400 degree oven for 20-25 minutes until tender. (For texture and presentation reasons, I reserved a few pieces of pumpkin to be a slender wedge shape to put on top).
Put a glug of olive oil (about a tablespoon) in a large pot (which will be used for risotto too) and sear mushrooms over medium high heat, browning both sides. Flip them after about 3 minutes to brown on other side. Remove from pot and set aside.
Reduce heat to medium low and add 1 more glug of olive oil to the large pot. Sauté shallot and onion for 2-3 minutes. Deglaze the pan with 1/2 cup white wine, stirring until wine has evaporated. Add risotto, toasting the grains and stirring for about 2 minutes. (This provides a little bit of armor for the risotto grains, shielding it from absorbing liquid too quickly which would result in a gummy risotto).
Now it’s time for the vegetable stock you have simmering nearby. Add one cup at a time of the stock, stirring risotto until all the liquid is absorbed before you add the next cup. I did this about 5 times until I had used all of the stock. The whole process will take around 17-19 minutes, just start checking/tasting the rice after 15 minutes. Remove from heat and stir in 1 T. chilled butter. The cold butter emulsifies, adding rich flavor, a pearly sheen and velvety texture.


 I’ve been on the tahini train and I’m not gettin’ off. It is a star ingredient in my menus for the cafe & catering spot I work at. I like to incorporate it into soups and sauces and cloak vegetables with it before roasting them. Ever since I made these cookies, adapted from a


 I love Fall slow cooking, with its cozy flavors and plethora of stodgy squashes. I particularly like cooking with good old pumpkin, and prefer it’s texture and taste to its famed cousin, butternut. Here is shares the stage with a variety of mushrooms (mostly shiitake), prepared with a savory miso broth.
